
If you search on the internet about the AIAG VDA DFMEA topic, you will not get the complete guide and method of how we can create DFMEA.
Either they give some theoretical concepts or ask you to do AIAG VDA DFMEA training.
To solve this problem, here is the complete practical guide on the AIAG-VDA DFMEA topic. You will learn with the help of examples and methodology.
So let’s dive in.
Before starting to learn anything you must know the purpose of the subject you are trying to
learn.
What is the purpose of DFMEA? #
First, the long form of the DFMEA is Design Failure Mode and Effect Analysis.
Day-by-day the industry is focus on excellent product quality. And there are many aspects
of quality, such as aesthetics, durability, reliability, cost, and many more.
Every organization is focusing on designing their product to meet all requirements.
And if you want a good product then there must not be any defect in it.
Therefore, it is important to identify the defects in an early stage of design.
It means before design release. So, the purpose of AIAG VDA Design FMEA is to identify and reduce the risk of design failures in the early stage of development.
How to create DFMEA in AIAG-VDA method? | 7 step AIAG VDA DFMEA #
As per AIAG-VDA, the DFMEA creates using the below steps,
- Planning and Preparation
- Structure Analysis
- Function Analysis
- Failure Analysis
- Risk Analysis
- Optimization
- Result Documentation
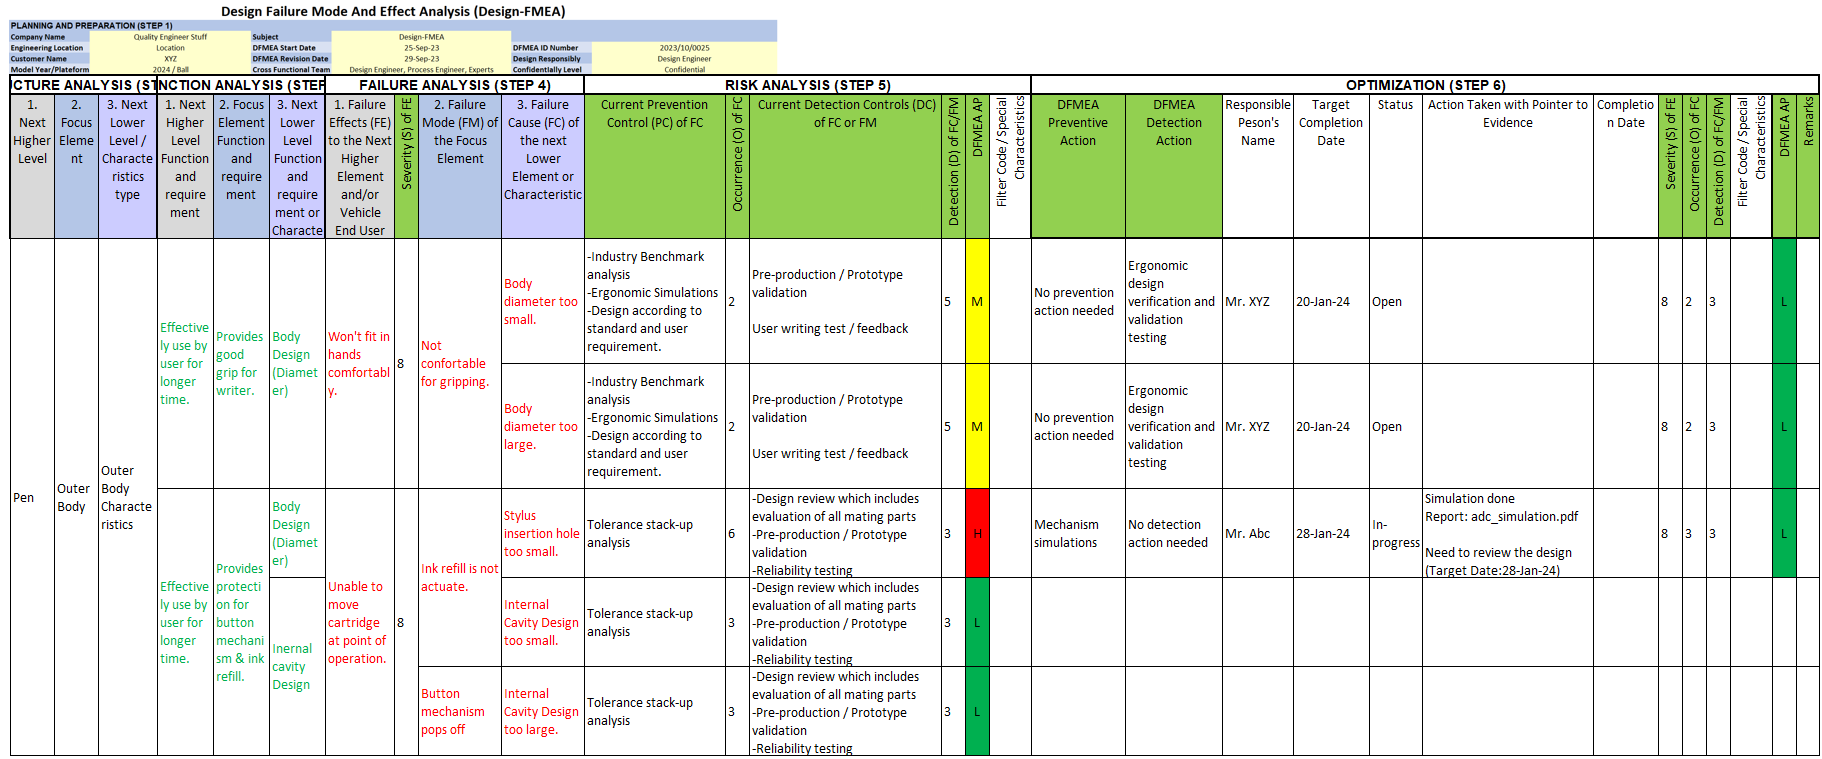
Now, let’s think you need to create the Design FMEA for assembly.
As you know we will learn the complete concept using the theory and example of Pen DFMEA.
So the first step is,
Step 1: DFMEA Planning and Preparation
This is the first step of DFMEA where we need to get the required information or inputs before starting the DFMEA.
First focus on DFMEA scope definition.
DFMEA scope
For scope, you need to consider below points,
Which product we will consider for the DFMEA study?
Which customer?
What are the customer-specific requirements we need to consider?
So here we will be considering the example of the “Writing Pen”.
You can refer to the below picture of the Pen.

Now our scope is to create the DFMEA for the Pen.
AIAG VDA DFMEA Project Planning
Project planning is done by the 5T’s method.
Where you need to get the details as,
- Team: FMEA Facilitator, Design Leader, Process Leader, Testing Experts, etc
- Time: FMEA timing, when to start and fininsh.
- InTent
- Tool: Which tools are you using? FMEA Software/Spreadsheet.
- Task
Product Information
Also, you need to fill in the required information about the product.
DFMEA form header information is also part of the planning and preparation step.

Get the inputs, required to do the further steps of the study. The below are generic inputs usually needed for the planning and preparation step and DFMEA study.
- Some regulation requirements
- Technical function requirements from the customer
- Customer-specific requirements
- Assembly Bill of Material (BOM)
- Etc.
Now let’s jump to the next step.
Step 2: Structure Analysis
Structure analysis covers the systematic arrangement of our product to do the DFMEA study in the same manner.
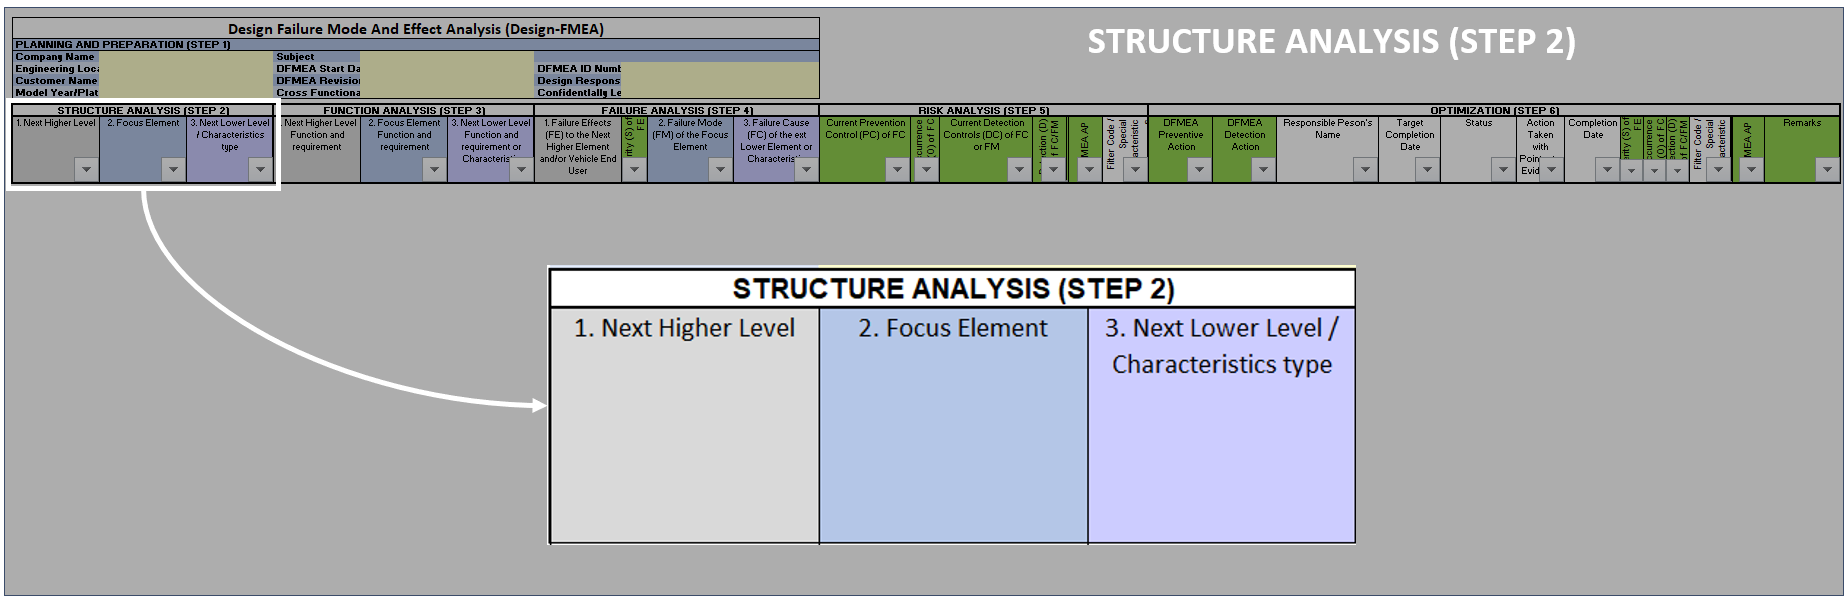
Product boundaries
Here you need a block diagram/boundary diagram that clearly mentions the behavior of our product.
It also clarify us that which components we will consider in our study and which will not.
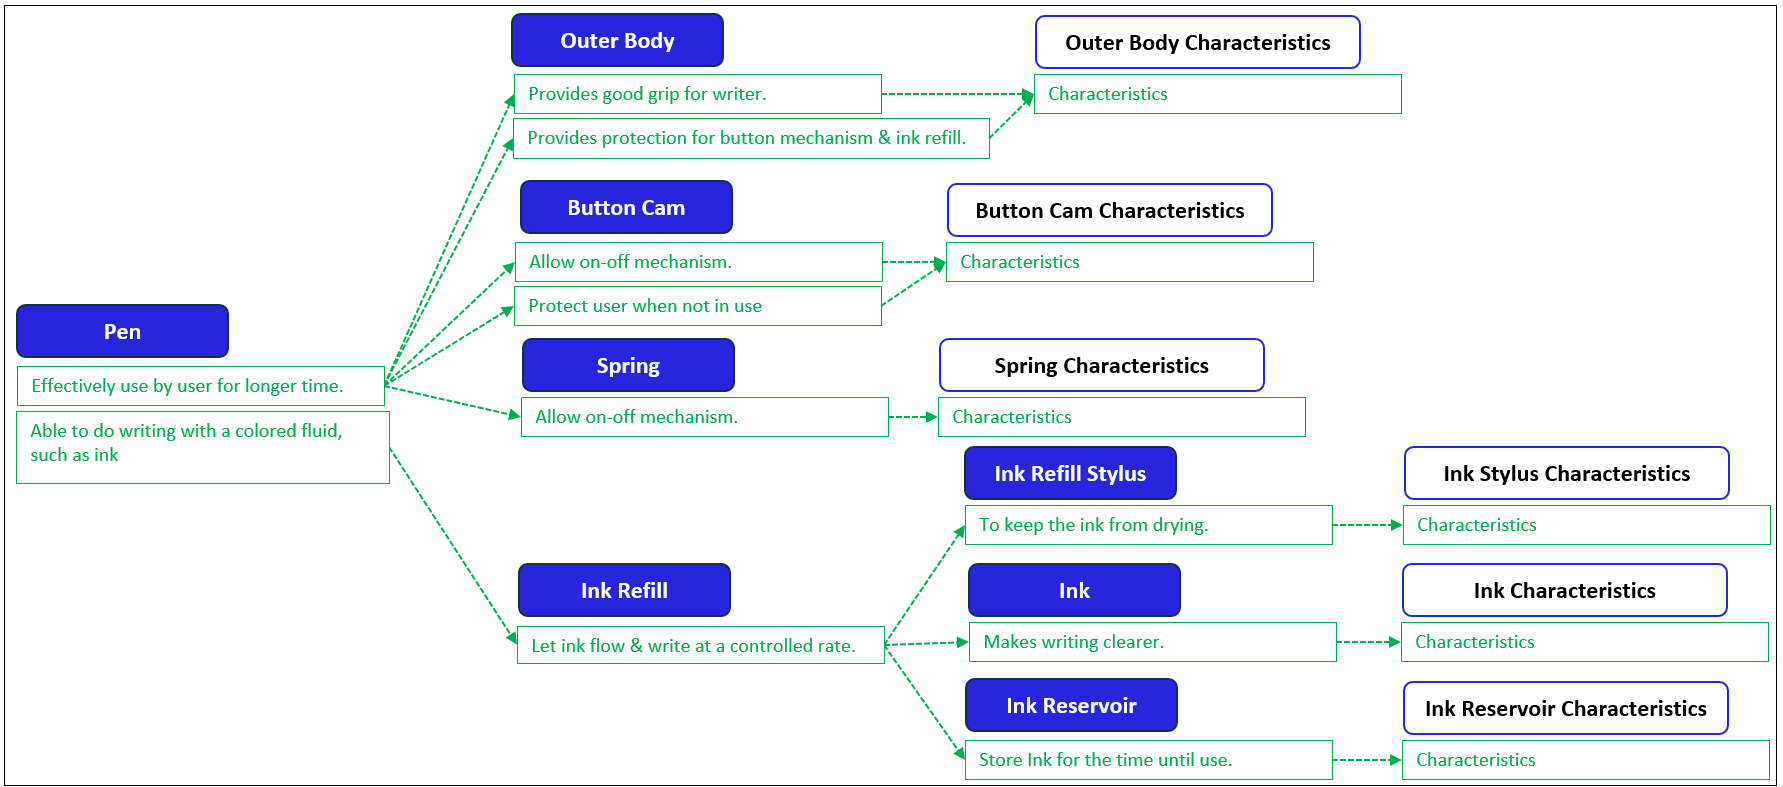
Let’s consider our example here.
We have a Writing Pen, and the block/boundary diagram is also with us, You can see below our Pen system and Pen elements,

You can see now our structure is ready as per the Assembly structure we have.
Here structure analysis is done. Will see the next step is function Analysis
Step 3: Function Analysis
The function means, what the assembly/component is intended to do.
Till now we have done our structure analysis.
Now each system element we need to identify the functions.
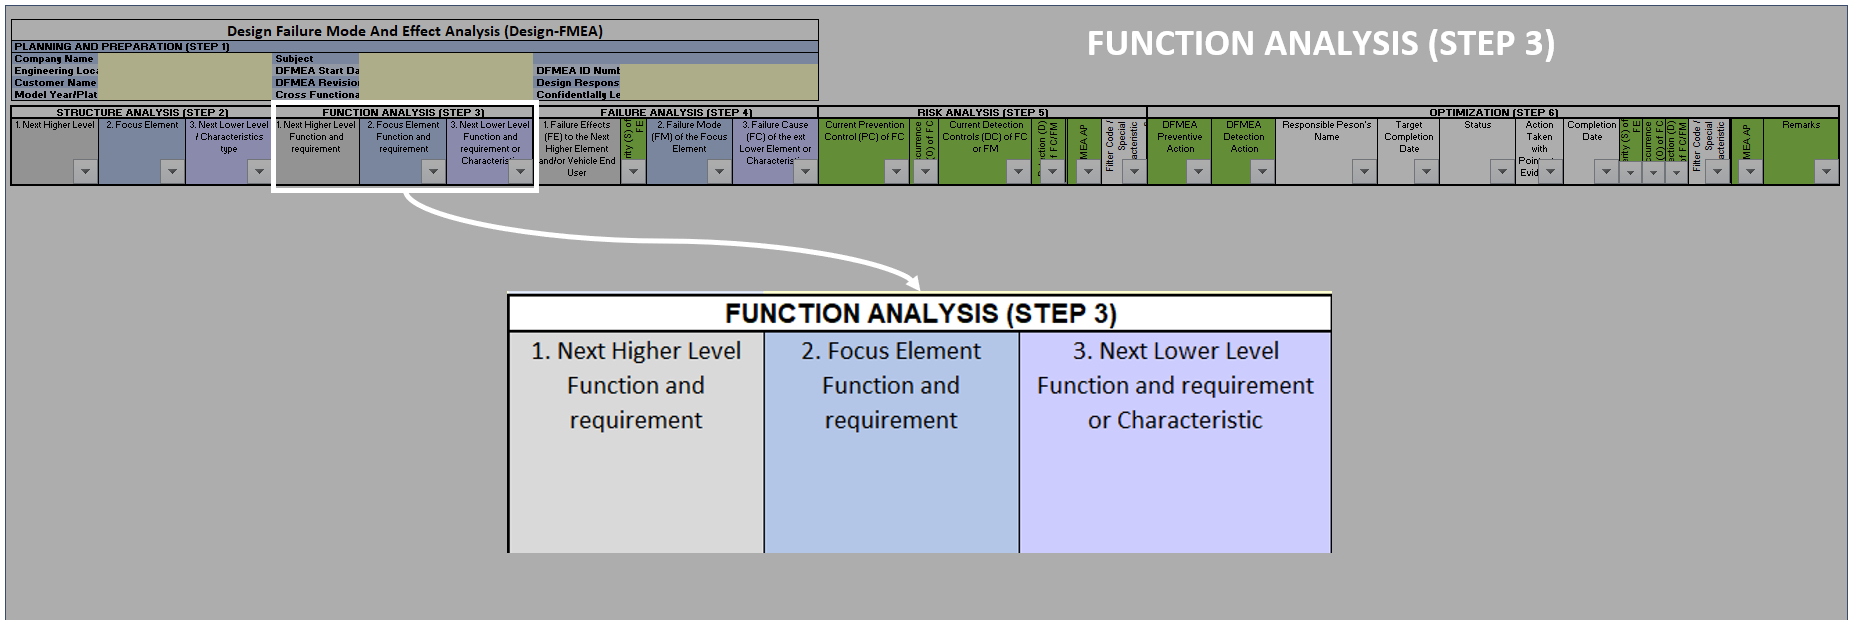
In our example the Top level we have Pen.
We need to define, what is the function of the Pen (complete system).
You can define the functions or requirements of the system elements Refer to green color texts as the function of the respective elements.
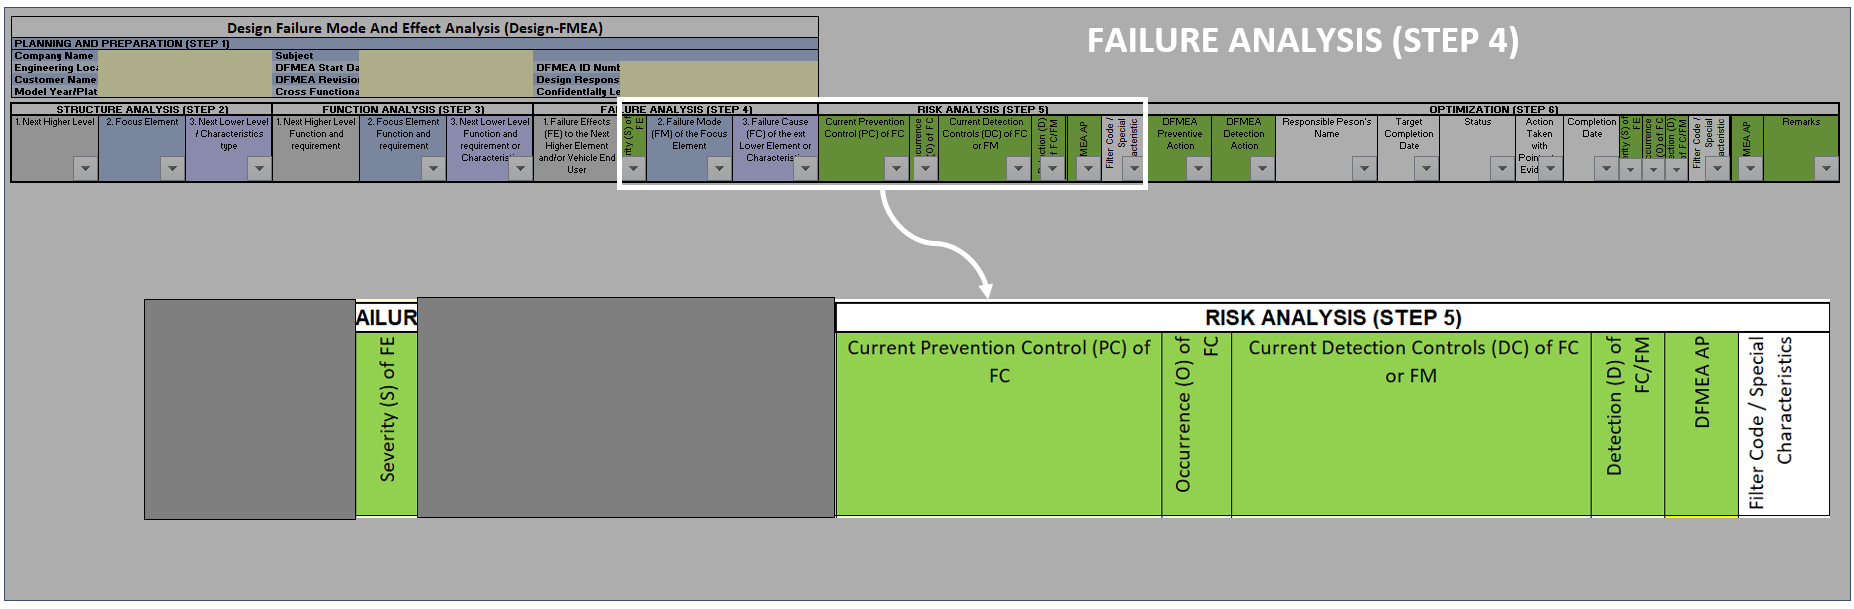
Step 4: Failure Analysis
This step is one of the important steps in Design FMEA.
We can call it failure analysis, and it is the heart of the FMEA study.
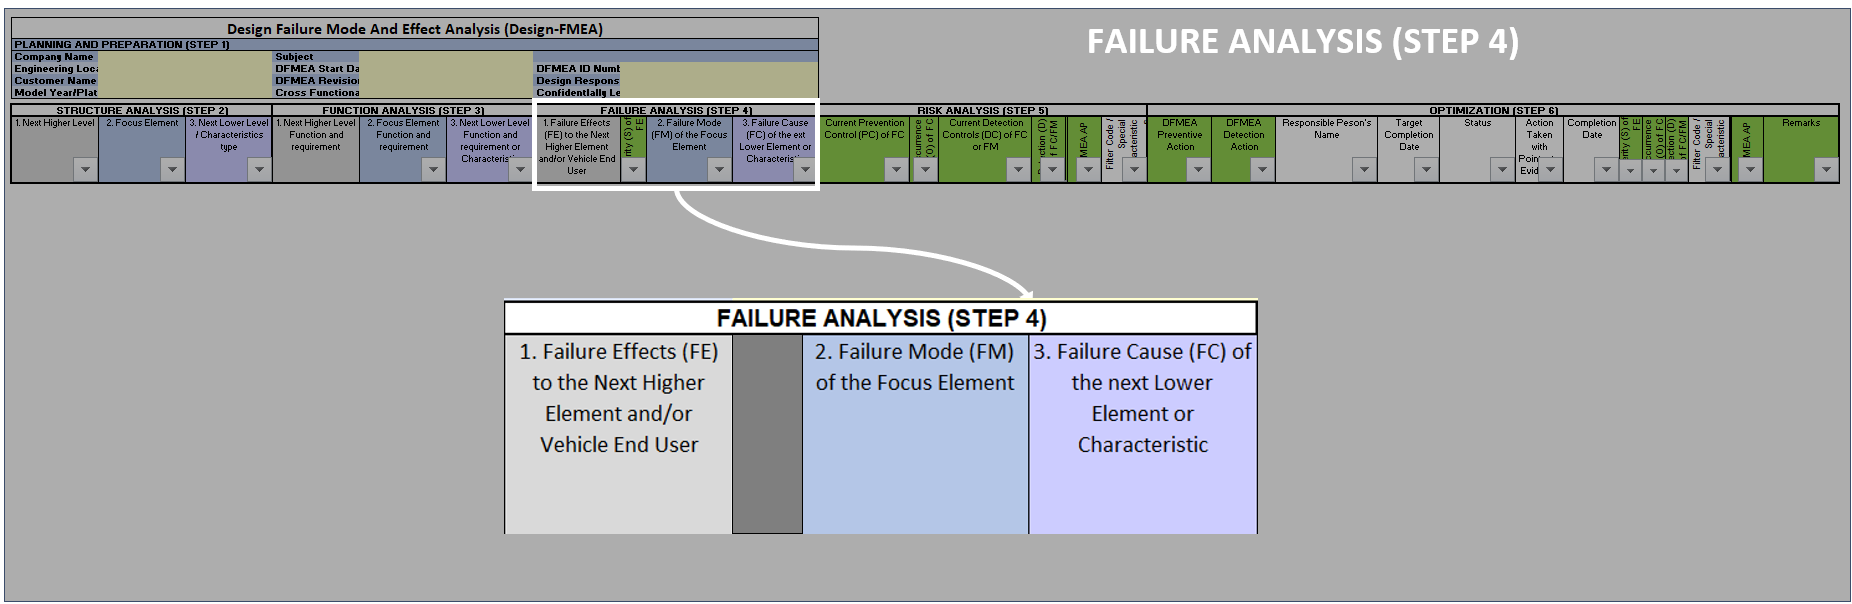
If you identify the functions well then the failure analysis is too easy.
Let’s go deeper into failure analysis.
How to identify the Failures in AIAG VDA DFMEA?
You can think of the ways that the function can fail.
The failures of the functions could be
- Loss of defined function
- Degradation of defined function
- A function fails over a period of time
- Function fails intermittently
- Perform excessively
- Perform reverse
in this way, you can identify the failures.
Some key points to understand while defining the failures
- The failures should be written in clear statements so everyone can understand them.
- The failures should not be common terminology such as improper, not ok, etc.
- Failures should be technical.
The failures of the respective level act as either Failure mode, failure effect, or failure cause.
Now we have one focus element in the structure.
We need to create the DFMEA of the focus element.

Then the failure of the focus element acts as a failure mode.
The failure of the next lower level connected to that failure mode is a failure cause. Due to the failure cause the failure mode happened.
The failure of the next higher level connected to failure mode is a failure effect.
Now you have the failure chain ready.
This failure chain can be read as due to the failure cause, failure mode happens and due to that, there is a consequence, which is failure effects.
You can take look on our example failure analysis chain.
In our example of pen, we already identified the functions and you can see below, where we identify the failures of one branch for the overview.

Failure Mode
The failure mode is failure associated with focus element. And it is coming from the functions
identified for the focus element.
Failure Effect:
As we know the failure effect is the consequences of the failure mode. Also, it will derived from the customer function failure.
While dealing with the failure effects we need to focus on which level the failure will happen.
- It can be at the customer level.
- Failure effect can be at end user level
- it may be some specific requirement failure. (Safety, regulatory or environmental requirement)
Failure Cause:
The name suggests it is the cause of our failure made.
It can be the specification or the design feature of the component/assembly.
If any specification fails then as a consequence the failure mode happens.
Step 5: Risk Analysing
The purpose of the risk analysis step is to identify the risk based on failures and their controls.
The activities in the risk analysis are,
- Identify the severity rating
- Identify the prevention control
- Give occurrence rating
- Identify the detection control
- Give detection ratings
- Analyze the risk
We will see one by one in detail how you can do it.
Let’s dive into risk analysis.
Identify the Severity Rating AIAG VDA DFMEA:
The severity rating depends on the how big impact of the failure effect. If the failure effect happens then how much level of impact will happen?
You can refer to the below table mentioning the severity levels and how you can choose the level depending on the failure effect.
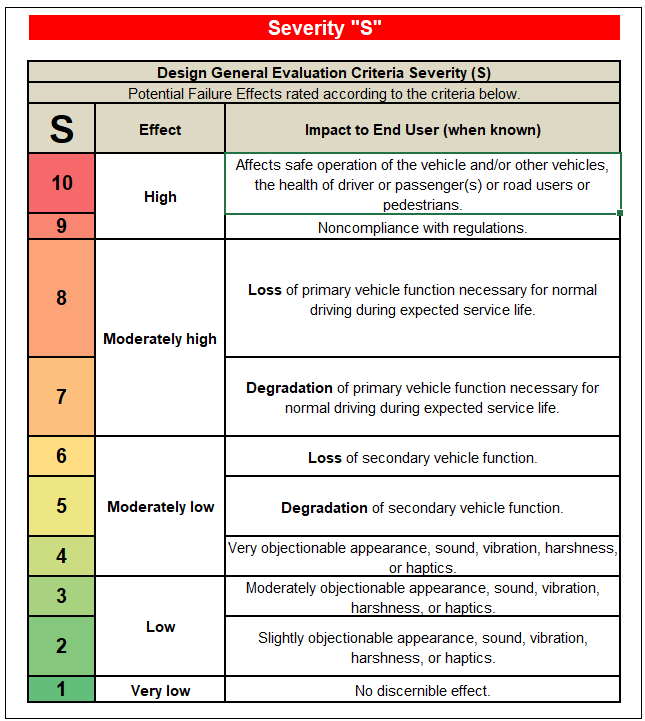
Some notes you can take on severity topics,
You should take the severity or associated failure data from the customer. So that you are taking the customer severity inputs and doing the analysis in the correct ways.
Why do we take severity data from customer?
because sometimes we may consider the wrong severity number for the failure effect of our DFMEA and, the customer inputs they have written are different.
Severity should always carry over from customer to supplier and sub-supplier for effective analysis and risk identification.
It also helps to align the design risk throughout from supplier to customer interface.
Identify the current Prevention Control
The current prevention controls are the actions that we refer to while designing the product.
Refer below prevention controls as an example,
- design guidelines,
- Methods
- standards,
- Catalog
- dimension tables,
- design simulations
- etc.
These controls will be used to prevent the failure from happening. These actions we generally Consider before design release.
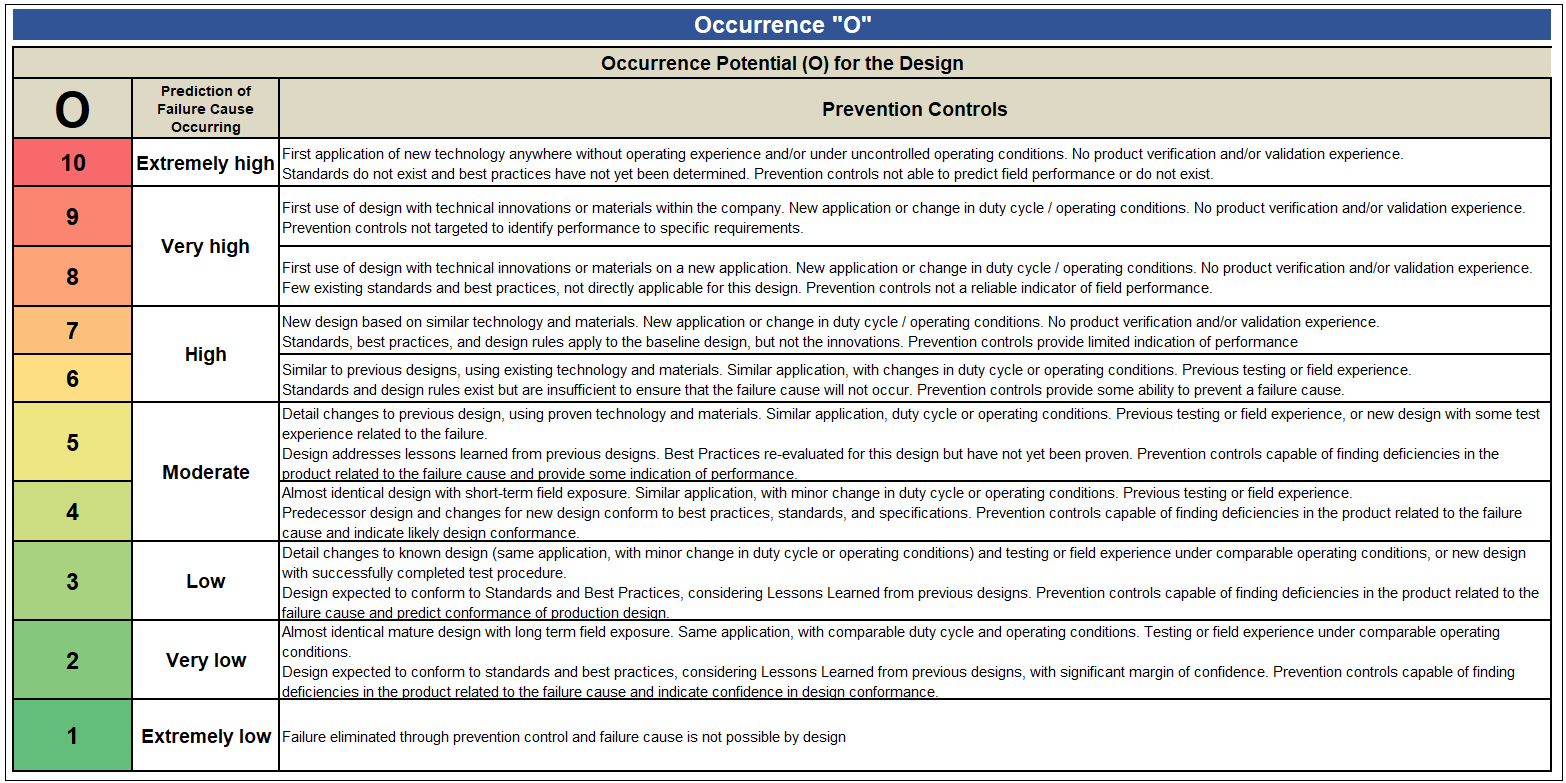
Occurrence ratings AIAG VDA DFMEA:
How frequently or the frequency of the failure causes generation defines the occurrence rating.
it is like you have identified the current prevention for the cause.
And how strong is the prevention to control the failure cause from happening?
This is the exact level you need to select from the table.
You can refer to the occurrence table below for the ratings and level.
Identify the detection control:
Detection controls are the action to detect the failure cause or failure mode.
Once our design is ready we need to Validate our design using some tests and procedures, those actions are considered as the detection control.
Generally, current detection controls are our planned design validation activities for our product.
Refer below detection control as an example,
- Design validation tests
- Durability test
- Endurance test
- Salt spray test
- Measurements Lab analysis
- Weld cut section analysis
These detection controls are used to detect the failure before production release.
One key point here to consider,
when we identify the prevention controls it will be for failure cause. And when we identify the detection controls it will be for failure cause and/or failure mode both.
Detection ratings AIAG VDA DFMEA:
The level of how strong our detection is considered the detection rating.
lt is the possibility to detect the failure cause and failure mode according to the detection controls.
You can refer below table as a detection rating guideline.

How to identify the risk?
You have completed all activities which require for risk analysis.
Now it’s time to analyze the risk based on the content we have. And this risk we called as Action priority as per the new AIAG-VDA standard.
Action Priority:
Before we calculated the risk based on the RPN method. Which is the multiplication of Severity x Occurrence x Detection.
Now we are using a new way of identifying the risk is Action Priority.
The action priority also depends on what is severity, occurrence, and detection.
Check those values in the table and you will get the final risk.
The action Priority is categorized into 3 ways
- Low (L)
- Medium (M)
- High (H)
You can refer below table to identify the correct risk priority.

Also learn the detailed guide on Action Priority, so that you will have a better understanding of a new concept.
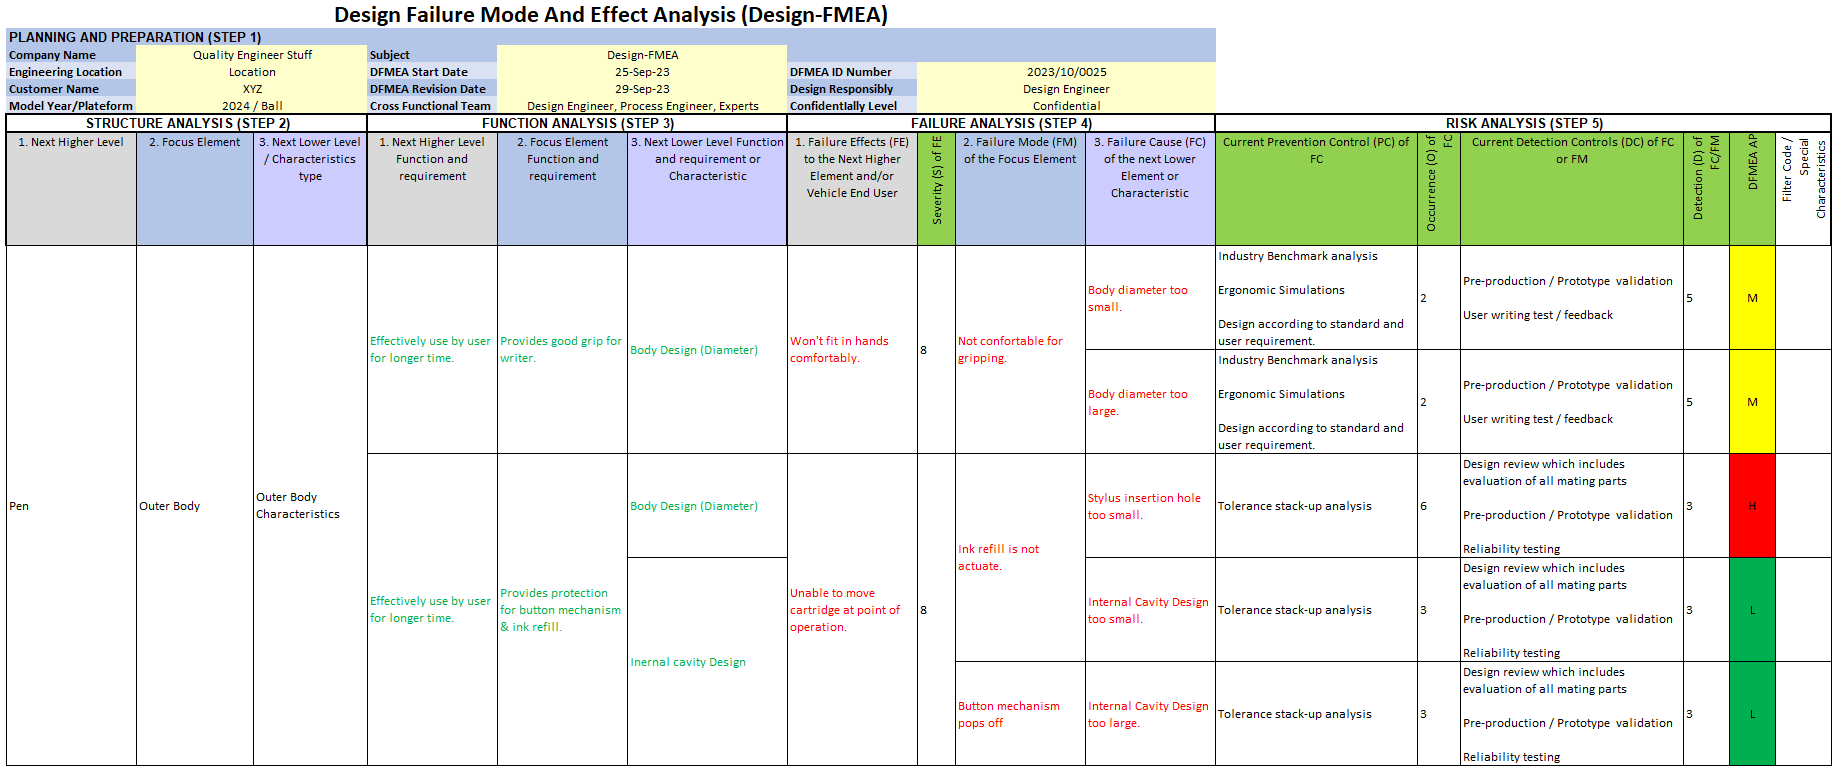
Now we will see our table showing the risk analysis example.
Till here you have done the risk analysis topic. Next step is to reduce the identified risk, called as Risk optimization step.
Step 6: Optimization
The purpose of the optimization step is to reduce the risk of product design failure. And the risk we already identified in our step 5 risk analysis.
In the optimization step, you recommend prevention and/or detection action to improve your design.
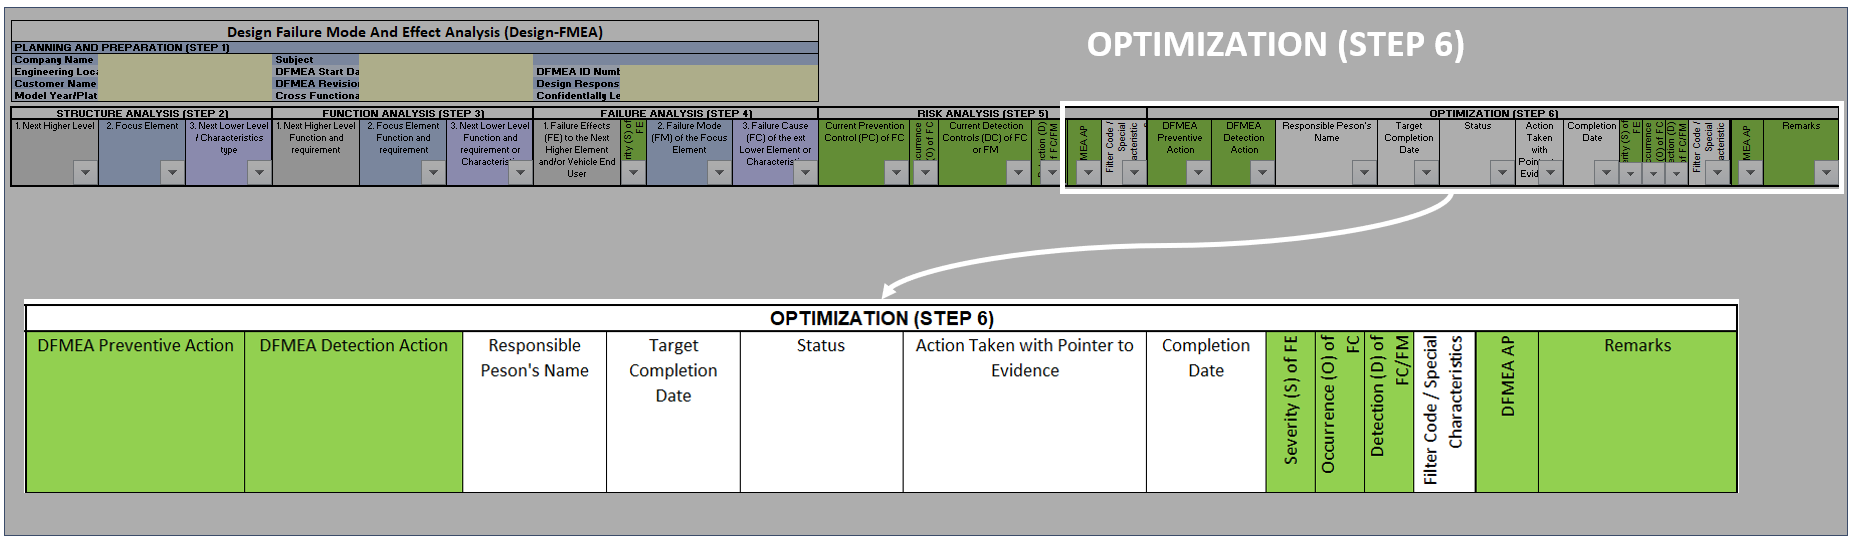
We add prevention action to reduce the risk by lowering the occurrence rating.
We add detection action to increase detection and reduce the risk by lowering the detection rating.
You can refer to the table of risk optimization steps below for our example.
There are some columns that we need to understand,
Optimization step content
Prevention action: Prevention actions to improve design.
Detection action: Detection action to improve design.
Responsible person’s name: The person who will take care of the action implementation and check the effectiveness of the result.
The responsible person should communicate the results of actions and ensure that the design is improved or not. The risk is really reduced or not.
Target Date: This is the tentative target date by which our action is implemented and completed.
Status: You need to update the DFMEA by taking follow-ups of an action plan. And regularly update the current status of the action.
The status includes the action is Open, In-process, Implementation pending, or Completed.
Action taken with pointer to evidence: You define the actions to improve the design in the prevention and detection column. But to complete the actions what actual activity you have done. Those you need to mention in the action taken column.
It can be the actual action you have done. It can be some documented evidence you can add.
If you perform any test then there must be a result of the test, so you can add those results.
Completion Date: This is the actual completion date of the action. This should be the date on which you have implemented the action and effectiveness is verified.
Severity (S): The maximum severity of the failure effects.
Occurrence (O): This is the revised occurrence rating after identifying the prevention action in the optimization step.
Detection (D): This is the revised detection rating after identifying the – detection action in the optimization step.
DFMEA AP: This is the final AP where you can actually said that the risk is now reduced.
How you can say that the risk is reduced?
let’s take an example here, we were high-risk. To reduce the risk, we have identified further prevention/detection actions. Based on the revised action the occurrence and detection ratings changed. Therefore 2nd AP is with reduced risk.
Step 7: Result Documentation
This is the final step of the AIAG VDA DFMEA study.
The purpose of this step is to make and communicate the output of the FMEA study.
As DFMEA is the risk analysis tool, so the output is more important from a management point of view.
And also it is the requirement of the IATF and/or ISO QMS standards.
Usually, we got below DFMEA results documentation as an output,
- DFMEA Form
- High and Medium Risk failures
- Product Characteristics
- Design Validation Plan
- Action to improve the design
- Design change recommendations
These are the outputs we get from the design FMEA analysis.
Also one of the importance of this step is, that we always face audits. The audits can be internal, external, customer, or QMS audits. The auditor will always ask the DFMEA and the results.
Now you are ready to demonstrate and show the results to the auditor. In future you can update the FMEA based on changes.
The output of DFMEA is helpful for the linkage between DFMEA & PFMEA.
Summary of the article #
Finally, is it clear how you can create AIAG VDA DFMEA?
DFMEA creation starts with the planning step where you can define the scope and collect basic inputs for DFMEA creation. Then structure analysis will give you a better picture of which components or assemblies we are including in our DFMEA study. We do the function analysis to identify the function of each system element. Then we do the failure analysis by the method of how our functions can fail.
Then the logical linkage of failure and function will help us to understand the failure mode, failure effect, and failure cause relation. Later we do the risk analysis by defining some prevention and detection control along with the severity, occurrence, and detection rating.
The risk is identified as the action priority of Low (L), Medium(M), and High(H). Next step we perform to reduce the risk by improving the design. This is done in the optimization step. Lastly, you need to do the result documentation to communicate the risk to the management and stakeholders.
We will be covering the AIAG-VDA Process FMEA guide soon.
Be part of our community by subscribing to the newsletter so that you will get the latest articles in advance.


